

What is a mid taper design?
A mid taper design is a mid-height taper haircut with a shaved pattern, line or shape added in the tapered area. The taper starts around the temple and shortens gradually toward the sideburn and nape. The design is then cut into that shorter zone with a trimmer, razor or foil shaver.
Most guys know the haircut they want but struggle to describe the design. The result is a design that sits too high, looks too busy or gets lost in the blend. This guide gives you the exact words to use, ideas sorted by complexity, and a back-view gallery plan so your barber sees what you see.
What Is a Mid Taper (and How Is It Different from a Mid Fade)?

A mid taper shortens the hair only around the temples, sideburns and neckline. The rest of the side panel stays fuller. A mid fade works differently. It takes the whole side down in a wider band, often to bare skin.
Here is the quick comparison:
| Feature | Mid Taper | Mid Fade |
|---|---|---|
| Starting point | Around the temple | Around the temple |
| Area affected | Temples, sideburns, nape | Whole side and back |
| Contrast | Softer | Sharper |
| Skin exposure | Often none or a light shadow | Usually down to skin |
| Typical clean look | About 3 to 5 weeks | About 2 to 3 weeks |
Be aware that barbers do not all use these words the same way. Many shops say “mid taper fade” for both cuts. That is why you should always add two details: where the shortest point is and whether you want skin or a shadow.
This matters for designs. A design needs a clean, short canvas. A taper that stays dark above the ear gives you a smaller canvas, so designs sit mostly at the nape, temple or sideburn. A mid fade gives you more bare skin to work with.
Mid Taper Design Ideas (Categorized by Placement & Complexity)

Sort your idea by two things: how visible it is and how hard it is to cut. Simple designs forgive mistakes. Complex designs need a skilled barber and more frequent visits.
Simple Designs (Office-Safe)
These are subtle and almost invisible from a distance.
- Hard part line: A thin razor line cut into the side of your part.
- Curved edge-up: A rounded, crisp line along the temple instead of a straight one.
- Single parallel line: One short line above the ear or sideburn.
- Shadow outline: A faint contour around the ear and neckline with no carved pattern.
Choose these if your workplace is conservative or you are trying a design for the first time.
Geometric Designs (Statement Styles)
Geometry looks sharp, but straight lines show every error.
- Stepped lines: Two or three short lines stacked like stairs.
- Triangles or arrows: Small shapes cut into the taper zone.
- Zigzag or lightning bolt: A sharp pattern near the temple.
- Square or notch cuts: Boxy shapes that follow the hairline.
Ask your barber if they use a stencil or a foil shaver for these. Both help with symmetry.
Freestyle Designs (Maximum Creativity)
Freestyle work is artistic and personal. It depends on your barber’s hand.
- Waves, swirls or flame shapes
- Initials, numbers or short symbols
- Mixed patterns that flow from the side into the back
Always look at a barber’s portfolio first. Freestyle work reveals skill fast, and mistakes are hard to hide.
What Are the Best Mid Taper Design Ideas for the Back of the Head?
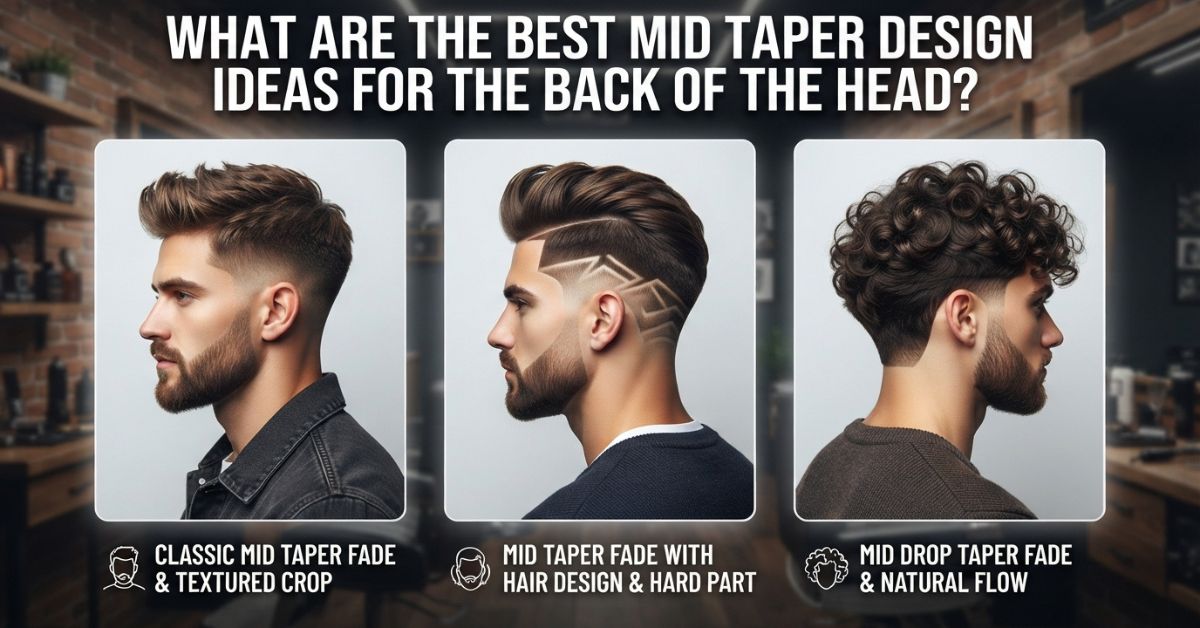
The back view is where most people forget to give instructions. Your barber sees the front and sides in the mirror but the nape is often rushed. A good back design should match your neckline and your head shape.
Back-view gallery tip: If you are building a gallery on your site, shoot every photo with the same lighting and a close crop at the nape. Use alt text like “mid taper design back view with curved nape line” so image search and AI tools can interpret each photo.
Nape-Specific Design Types
- Rounded neckline: Soft and natural. It hides growth better than other shapes.
- Squared neckline: Sharp and clean, but it needs more frequent touch-ups.
- Tapered neckline: The hair fades out along the natural hairline. It is the most low-maintenance option.
- Center line or spine design: A thin vertical line running down the nape.
- V-shape or arrow: A pointed cut that follows the nape’s center.
- Side-to-back wraparound: A line that starts at the temple and continues behind the ear.
- Small symbol or initials: Placed at the base of the skull.
If you have a low hairline or a very hairy neck, avoid thin detailed lines. They blur quickly. Bold, simple shapes survive better.
Mid-Taper Side Designs (Temple & Sideburn Placement)
The side is the most visible area. Strangers see it, and your own mirror shows it every day. Placement matters as much as the pattern. A design too high gets lost in the top hair. A design too low looks like a mistake.
Side Design Placement Options
- Temple: The most popular spot. It frames your face and shows even with a medium-length top.
- Sideburn: A small line or notch beside the ear. Subtle and easy to repeat.
- Above the ear: Works best on a taper that is cut shorter on the sides.
- Behind the ear: Good for hidden or conservative designs.
- Part line: Combines your design with a razor part.
A good rule: if you want your design to show, keep it at or below the temple. If you want it to hide, keep it low behind the ear. Ask your barber to mark the intended height on your head before cutting. A quick check like this removes most vocabulary mix-ups.
What Should I Tell My Barber to Get a Mid-Taper Design?
Vague requests get vague results. Do not say “something cool on the sides.” Give your barber a short, structured brief. If you bring a photo, make sure it is a side or back view, since a front photo hides most of the detail.
The 4-Part Barber Communication Script
- Name the base cut. Say “mid taper” and add “temples, sideburns and nape” if you want the sides kept full.
- Set the shortest length. Choose skin, a shadow, a 0.5 or a 1 guard. This is the biggest cause of confusion.
- Describe the design. Give the shape, size and placement. Example: “a thin curved line starting at the temple, about two finger-widths long.”
- Say the top style. Mention the length and how you part or style it, so the design and the top fit together.
Sample script:
“I would like a mid taper with a shadow at the bottom, kept dark above the ear. Please add a single curved line at my left temple, about the width of two fingers. Keep the top longer for a side part.”
Add two more habits:
- Ask to see the design in the mirror before the final trim.
- Tell your barber if you want it symmetrical or only on one side.
Do Mid Taper Designs Work with My Hair Type?
Yes, but the technique changes. The design works because of contrast between the shaved area and the hair around it. Hair texture, density and growth pattern all affect how that contrast looks.
Mid Taper Design Compatibility by Hair Type
| Hair Type | How It Works | Best Design Style |
|---|---|---|
| Straight | Shows lines clearly. Mistakes are visible. | Geometric, thin lines |
| Wavy | Natural softness balances the design. | Curved lines, simple shapes |
| Curly | Strong contrast and definition. | Bold and freestyle designs |
| Coily/Afro | Excellent canvas for sharp detail. | Any style, including intricate work |
| Fine/thin | The design can look sparse. | Simple and small |
| Thick | Holds volume and pattern well. | Larger, bolder designs |
Top Style Pairings
- Textured crop: Good with geometric designs.
- Quiff or pompadour: Pairs with simple and thin lines.
- Side part: Great with a hard part line.
- Curls on top: Adds contrast with a bold side design.
- Buzz cut: Showcases detailed freestyle work.
How Do I Choose a Design for Work vs. a Bold Statement?

Match the design to the room you walk into most often. If you meet clients every day, subtle is safer. If your job is creative, you have more freedom. Remember that an office-safe design can still look sharp.
Design Appropriateness Scale
| Level | Description | Example | Best For |
|---|---|---|---|
| 1 | Nearly invisible | Shadow outline | Corporate roles |
| 2 | Subtle | Hard part, single line | Business casual |
| 3 | Noticeable | Curved temple line | Most workplaces |
| 4 | Bold | Geometric pattern | Creative fields, weekends |
| 5 | Maximum | Freestyle art | Events, personal style |
If you are unsure, start at level 2 or 3. You can always go bolder next time. Removing a design is much harder than adding one.
How Long Does a Mid Taper Design Last?
A mid taper design usually looks crisp for about 2 to 3 weeks and acceptable for 4 to 5. Hair grows roughly half an inch (about 1.2 cm) each month, so even small growth softens fine lines. Thin lines blur first. Wide, bold shapes last longer.
Mid Taper Design Growth Timeline
| Time | What You See |
|---|---|
| Day 1 to 7 | Sharp lines, full contrast |
| Week 2 | Slight stubble, lines still clear |
| Week 3 | Edges soften, thin lines blur |
| Week 4 | The design is visible but fuzzy |
| Week 5 and beyond | Needs a touch-up or a full redo |
A taper without much skin shows growth more slowly than a skin fade. If you want fewer visits, choose a shadow over bare skin and avoid very thin lines.
What Mistakes Should I Avoid?
5 Common Mid Taper Design Mistakes
- Using vague words. “Fade” and “taper” mean different things to different barbers. Always give a guard number or a placement.
- Skipping the back view. The nape is part of the design. Bring a photo of it.
- Choosing a design that fights your hair. A cowlick, a low hairline or thin hair can change how the pattern sits.
- Going too bold at the start. A huge design is hard to hide if you dislike it.
- Ignoring upkeep. Detailed designs need more regular visits. Plan your budget and your schedule before you commit.
Frequently Asked Questions
What’s the difference between a taper and a fade?
A taper shortens hair gradually and usually keeps some length at the edges. A fade blends down to skin or very short stubble across a wider area.
How much does a mid taper with design cost?
Prices vary by city and barber. In the US a mid taper often costs $25 to $60, with a design adding roughly $5 to $20 depending on complexity.
Can I get a mid taper design if I have a cowlick?
Yes, but pick a placement away from the cowlick or ask your barber to angle the blend around it. Simple designs work best.
Do mid-taper designs work for thinning hair?
They can. Keep the design small and simple, and avoid thin lines that make sparse areas look more noticeable.
What’s the best mid-taper design for a flathead?
Choose a design that adds shape at the temple, such as a curved line, and keep the sides fuller to balance the back of your head. Ask your barber to blend carefully at the crown.
How do I maintain a mid-taper design between barber visits?
Trim only the neckline and sideburns if you must, and avoid touching the design itself. Moisturize your scalp and book your next visit before the lines fully blur.
Key Takeaways
- A mid taper design is a mid-height taper with a shaved pattern in the shortened zone.
- A taper keeps more side weight, while a fade takes more hair down to skin.
- Pick your design by complexity: simple, geometric or freestyle.
- Plan the back view and the nape, not just the sides.
- Use the 4-part script: base cut, shortest length, design details and top style.
- Match your hair type to the design. Thin lines suit straight hair and bold lines suit curly or coily hair.
- Expect a crisp look for 2 to 3 weeks and plan your visits around that.
- Start subtle if you are new to designs.
Bring a side-view photo and a clear brief to your next appointment. That small effort is usually the difference between a design you love and one you grow out.
Quick notes for you
- Word count is about 2,000 and the main keyword appears roughly 15 times (about 0.7% density).
- The cost, timeline and maintenance ranges are general estimates drawn from the competing pages. Add local pricing if you target a specific country.
- I could not insert real back-view photos. For the “gallery,” add 6 to 8 images with descriptive alt text.

Marco Silva is a fashion writer and content creator at Faxhion Purly, sharing practical insights on clothing, styling, fashion trends, and personal style. With a focus on research and clear communication, Marco creates reader friendly articles designed to help fashion enthusiasts discover useful ideas, understand trends, and make informed style choices.